Categories
Project

Desk Lamp Conversion

Introduction

If you’re looking for a simple project to introduce yourself to the world of home power then you can’t find a project much easier than converting a common desk lamp to use 12V DC battery power as opposed to 120V AC from a wall socket.

I chose this project because I can recharge the batteries from my solar panels and know I’m using green energy. Some use cases for this project are to take the lamp someplace where AC power isn’t available, such as camping, or where AC is inconvenient to access, like an attic (think flashlight with a sitting base).

Step 0: Unplug the lamp!!

I’m not a safety expert but I do use good common sense when working on electronic projects. Especially when it involves 120V AC! You too should use common sense. Don’t work on the project while it is plugged into the wall!

Step 1: Select a lamp

Convert standard desk lamp to 12V battery power

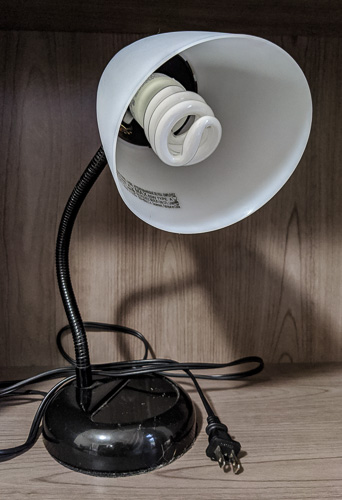
I selected a desk lap that I’ve had for several years. It was beginning to show its age so rather than retire it I decided to try and give it some new life. I liked this lamp as the design was simple. A single twist on/off switch at the top of the lamp as opposed to a fancier 3-way switch. A quick read of the warning label let me know the design could handle a simple LED bulb.

Step 2: Select the bulb

12V 7W Bulb
12V 7W Bulb

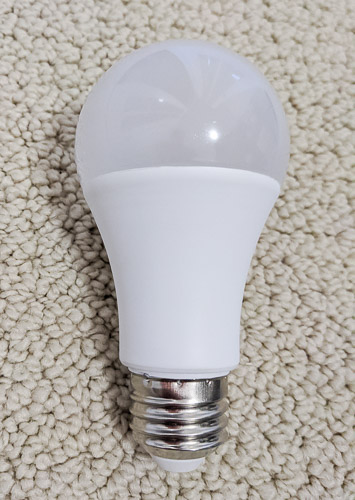
I want a bulb as bright as the CFL I am replacing so I searched the internet for a powerful 12V bulb. I found these 7W models on Amazon. So far I’ve had no issue with the operation of these bulbs. They lack labeling of any kind so I resorted to labeling them with a sharpie otherwise I’m liable to screw them in to a 120V which will ruin them instantly.

Some notes about bulb selection. 7W is the brightest 12V bulb I could find at what I thought was a reasonable price point. 7W is a lot of power and these bulbs are bright. The downside to this is that they draw a lot of current and will drain small batteries quickly. My initial estimates say maybe 2 hours of bright light from my battery pack.

Skip this next section if you don’t like math. 7Wh @ 12V = 583mAh. For my power source I chose to use 8x AA 1.2V NiMH batteries @ 1900mAH. The batteries will produce around 1.3V each. 8x 1.3V = 10.4V so not a full 12V. Time to redo the math, 7W @10.4V = 673mA. The wire in the small alligator clips I’m using will probably get hot quickly. I guess that the current draw could go as high as 750mA so 20 AWG wire would provide some safety margin.

Choose your bulb size with both your use and power source in mind. A powerful bulb will drain batteries quickly but shine more brightly than a lower wattage bulb. For my use case the batteries may last 2 hours if the voltage remains constant, which it won’t. This will also drain the batteries completely which isn’t good for them. I’ll report my actual results down below.

Step 3: Remove the base

Lamp base after removing bottom cover

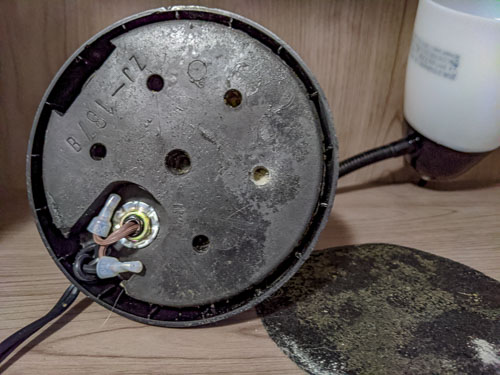
In my case the base was a felt and plastic pad with some sticky stuff on one side. As I mentioned, the lamp was old so the pad pealed off without much resistance.

Step 4: Untwist the wires

I found a pair of simple clear plastic wire connectors under the pad which I untwisted with my fingers exposing the bare copper wires.

Step 5: Remove the 120V power cord

Power plug untwisted from the lamp fixture

Removing the power cord, black in my case was as simple as untwisting the knot and feeding the cord back through the hole in the base.

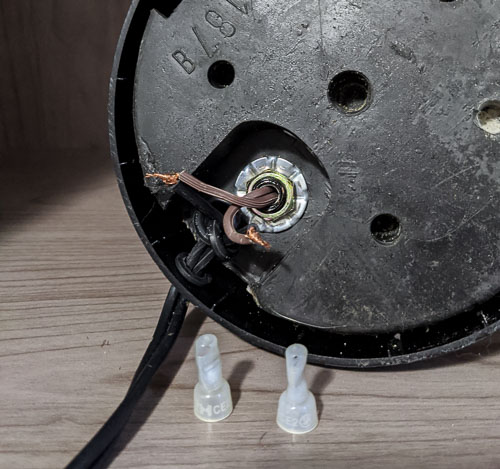
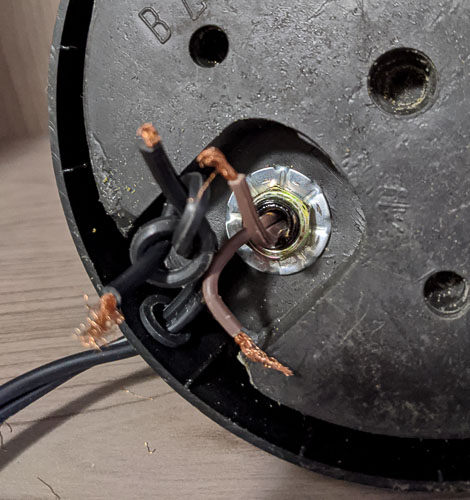
Step 6: Find which wire is positive (+)

As I was attaching the battery I realized that there wasn’t any clear indication which wire going up to the fixture was positive and which was negative. A quick Google search revealed that the positive wire is attached to the tip of the light bulb socket, while the negative wire is attached to the rim of the bulb socket.

With the above in mind I got my multi-meter and tested which of the wires was attached to the tip of the socket. Armed with this information I proceeded to the next step.

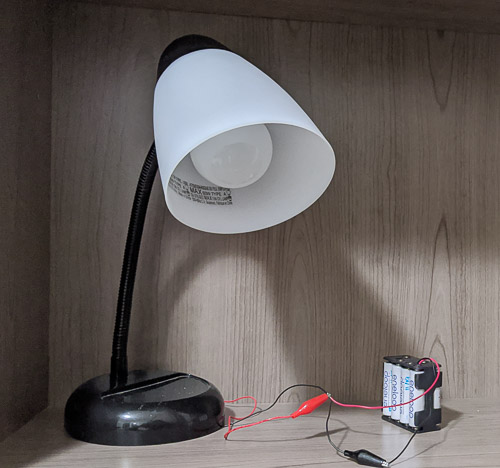
Step 7: Attach the battery

Wiring up the battery with alligator clips

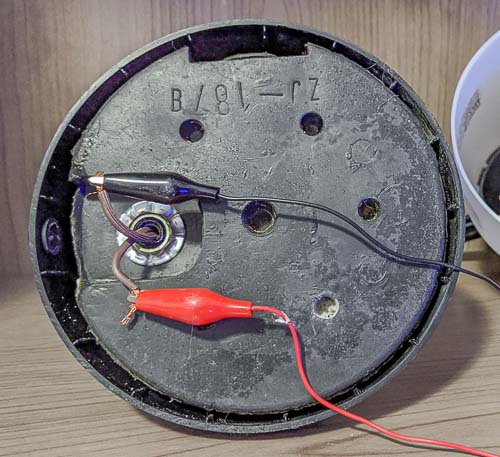
For my power source I chose to put eight (8) AA NiMH rechargeable batteries in series. I like the Panasonic Eneloop brand 1900mAh because they hold their charge much better than standard NiMH batteries.

Using simple alligator clips I attached the battery to the wires as shown being aware to attach the positive and negative to the correct wire.

Step 8: Check for mistakes

Final check before turning the switch

It’s always worth a final check of one’s work before turning the switch. I double checked my wiring then the moment of truth was at hand.

Step 9: Turn the switch

Light!! It works :)
Light!! It works 🙂

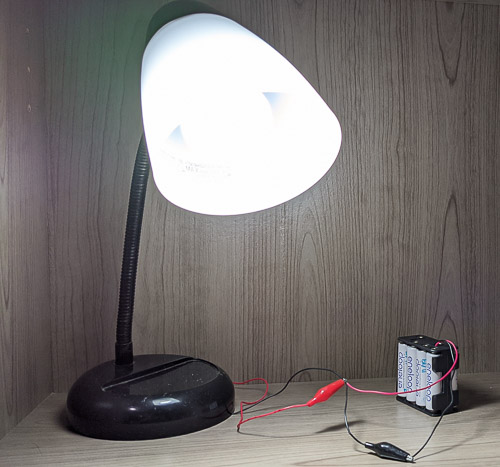
The light was almost blindingly bright when I turned it on the lamp. Given this was powered by a bunch of AA batteries it was brighter than expected.

I did some checks after leaving the lamp on for several minutes and while the wires weren’t smoking, they did get hot to the touch so before trying to put this into use in my bedroom I am going to have to upgrade to a larger size wire.

Summary

I hope these simple steps have encouraged you to try your hand at converting a simple desk lamp to use battery power.

Choosing the right bulb and power source are two simple yet critical decisions both upon which the success of your project may rest. Pair a powerful bulb with a small battery source and you may find yourself in the dark a lot sooner that you’d have expected because the battery just isn’t large enough to provide the required amount of power for the length of time desired.

Size your wire appropriately because small wires will heat up quickly and a fire can result, even from AA batteries. 7W may not sound like it draws much current at 120V. A mere 0.05mAh. Drop the voltage from 120 volts to 12 volts and the current increases ten fold (10x). .

Best of luck to you on all your projects!

Categories
Uncategorized

Power Hungry!

More! I want more!

Today I feel like a kid in a candy store with no money. My battery banks are empty and it is cloudy outside. My tiny 12V solar array comprised a 10W panel and two 5W panels isn’t getting enough light to produce enough voltage and current to power the buck converter.

12V solar to 5V USB buck converter. Panel’s output is a solid 21.2V on a sunny day.

The time has come to purchase a larger solar panel. I think my next purchase will be a 35W mono-crystalline panel capable of 2A output. The physical size of the 35W panel should make it easy for me to move round the yard keeping it in the direct sun and out of the overabundant winter shade.

I recently started prototyping a nano wind turbine and hope to have some photos and results to post soon. For now I’ll have to hope for another sunny day to fill my battery bank and fulfill my desire for more power.

Categories
Uncategorized

Bad Cable?

I spent about 30 minutes today trying to diagnose why my array of solar panels was putting out only about 0.03A when I was expecting between 1 – 2A. After testing that the current output of each solar panel was within expected range I decided to replace the USB cable. Immediately current output increased to next maximum expected output.

In another instance of a bad cable, I was testing the voltage produced by a self wound coil. Rather than the 60 – 70mV for which I was hoping a mere 3 – 4mV. By chance I happened to bump an alagator ckip and observed a voltage bump and then drop back to 3mV. Immediately I replaced the cable and measurements verified the expected voltage output.

A side note, I cut the alligator cable in two and now have two handy clamps to connect loose wire ends.

No great moral to this brief antidote. Don’t let something like a bad cable ruin your day.

Categories
Project

Let’s get Wet

Today’s delivery included two tiny hydro turbines! I quickly rushed out on my lunch hour to purchase some adapter hardware and give them a squirt.

To my amazement, after hooking it to my common variety garden hose and cranking up the water pressure, it delivered a full 12V. Actually up to 12.55V. Amperage was very close to the advertised 220mAh.

Before getting to excited this was all under no load and ran for maybe 2-3 minutes before it started to rain for real and I returned inside.

Just having done this tiny experiment gives some new project ideas for the future:

  • Nano hydro turbine powered garden sprinkler flashlight – water your lawn or garden at night without power cords or batteries
  • Nano hydro turbine powered lawn sprinkler w/colored lights – water your lawn at night. The water drops will reflect the colored light from the LEDs making for enjoyable visual experience.

I am considering ordering the 80V nano hydro turbine and giving that a try too. The unit is the same size so I am postulating that it doesn’t have the voltage limiting circuit included the 12V and 5V models.

My larger goal is to hook say 4 – 6 of these is parallel up to my rain gutter in an attempt to see how much power I can harvest during a good storm using the nano hydro turbine. Check out my DIY Nano Hydro Turbine project.

Categories
Uncategorized

Running out of juice!

Over the past few days I’ve been blessed with the power capacity to charge my cell phone with harvested solar power. Unfortunately the past two days have been pretty foggy and yesterday the sun didn’t peek through at all so I’m going to resort to giving my cell phone a full charge from the grid. Not my preference but given the current sate of my environment I’ve done what I can to harvest and use my own power.

I’m choosing to think of what devices I can charge that don’t hold a lot of juice. My cell phone and battery banks are in my mind clearly too large to be considered. Below is a list of items that possibly qualify.

Devices requiring small charge

  • Fitbit – Fitness Tracker
  • iWatch – Smart Watch
  • Sonicare – Electric Toothbrush
  • GPS
  • GoPro – Digital Camera
  • Wireless game controller
  • Vape pen
  • Bluetooth Devices
    • Headset
    • Bluetooth speaker
  • Wireless keyboard and/or mouse
  • Rechargeable battery
    • Wall clock
    • Wireless game controller

I’m going to predict that as the IoT begins to expand from early adoption into the main stream we’ll see a plethora of lower power devices that won’t be directly connected to the grid thus requiring some type of battery power to maintain normal operation in addition to wi-fi or other capability.

Can you think of any low power devices I missed? Let me know in the comments below and I’ll add it to the list.

Categories
Project

Baker come bake me a “loaf”?

Good news today! I achieved one of my goals that started me on this journey of harvesting my own power at home. The goal was to bake a loaf of bread using a battery and an inverter. While this isn’t my final goal of actually baking a loaf of bread using 100% self-harvested power it is a worthwhile way point along this particular path.

A few years ago I bought a bread machine so I could easily bake fresh bread at home. A Zojirushi BB-HAC10 1 pound loaf bread machine to be specific. It has served the family well and I’ve fiddled with a whole wheat bread recipe so that it is to my liking.

I think I’m a measurement freak because I found myself hooking my Kill-a-watt inline with the bread machine, curious as to how much it was really costing me in energy to bake a loaf of bread. I won’t spoil the mystery by telling how much it cost just yet.

What I did learn by monitoring with the Kill-a-watt was that the lion’s share of the power is used during the baking cycle. The full process of making the bread from the time the start button is pressed until the bread “pops” out fresh and hot is about 3 1/2 hours. Mixing and kneading between the rising cycles used a very small amount of power. Measurements showed that the heating element used about 450 watts/hour and drew 3.75 amps of current. The heating element appeared to use an 80% duty cycle to keep its oven temperature constant so the high current draw wasn’t continuous during baking.

If at first you don’t succeed

Now translate this all into my failed dream of a no cost solar bakery. My first attempt to bake bread using my 500W modified sine wave inverter and battery from my ’97 Toyota Tacoma failed. While the process appeared to start well, for what reason it failed is currently unknown. My first suspect is the inverter because the impeller in the bread machine failed to spin and mix the ingredients even though the heater did heat the oven to the proper rising temperature. The current requirements for this part of the cycle didn’t seem high enough to even tax the battery. When I checked the voltage it appeared to be in the normal range and the low voltage alert on the inverter never sounded. This leads me to believe that maybe the bread machine required a cleaner power signal than the modified sine wave inverter could provide.

Not knowing for sure if it was the inverter or the battery at fault I decided I needed to replace both with what I thought was more appropriate.

Go big or go home!

I know that having plenty of head room when it comes to electrical systems is a good idea I decided to go big! (not to mention that I already am home so that isn’t really a useful option) I stopped by two local battery shops looking for some advice and to purchase a better battery but to no avail. My first stop resulted in my being referred to the store manager who quickly decided to hedge his bet and recommend his largest deep cycle battery. A little frustrated that he didn’t take the time to think through my needs I said thank you and drove to the second store. I ended leaving a message for the manager at the second store but never got that call back so I was on my own to do research.

While I was still unsure about which type or model of battery to purchase, I felt more confident in the realm of the inverter. I knew the bread machine used 450w/h during the peak of the cycle and that was pretty close to the inverter’s maximum continuous rating of 500W (800W peak). Knowing I wanted to upgrade to a pure sine wave rather than a modified sine wave I did some research online and found a 2000W (3000W peak) inverter that fit a comfortable price point for me. $250 for Home Depot and a few days later a 2000W pure sine wave inverter arrived on my doorstep.

While I was waiting for the inverter to be delivered I continued researching batteries. I decided on a deep cycle gel battery. Since I was going to be moving it around quite a bit I wanted the ruggedness that the gel battery offered. Capacity wise I opted to go with 100Ah. I considered a 200Ah (the big one suggested by the first store manager) but the sheer weight of it meant I would need my wife’s help to move around the house until I find it’s permanent home. I would have loved to buy a light weight lithium battery but the price point is just too high currently

My calculations showed that the total baking cycle consumed about 18Ah @ 12V. Using ohm’s law I considered that 3.75A @ 120V = 33.5A @ 12V during the peak of the bake. Then doing some guessing based on the battery data sheet a 100Ah battery felt about right if the discharge cycle was only 20% to bake the loaf. The current discharge also fell, in what appeared to me, within normal use range. Both of these factors are within the suggested limits to extend battery life.

I was going to order the battery from Home Depot as well as the inverter but by the time I got around to placing the battery order Home Depot was out of stock. Amazon offered the same battery for around $20 less and free next day delivery with Prime. (I assume Amazon had it stocked at a nearby warehouse as the don’t ship these batteries via air freight)

Success

First loaf of whole wheat bread successfully baked using a 2000W inverter and battery.

Using Amazon’s next day delivery option the battery actually arrived earlier the same day as the inverter. I’ll detail how I hooked up the battery, inverter and bread machine in another post but the end result was what I considered to be a nominal loaf of whole wheat bread. (The loaf was a bit misshapen, this happens from time to time with a bread machine.)

Oh yea, I almost forgot. I promised to tell you how much it cost using grid power to bake the loaf of bread using the machine. The answer is about 3 cents. The Kill-a-watt reported that it took about 220 watt hours to bake the loaf. At 14 cents/kWh (using the green wind power up sell) * 0.22 = 0.0308. Compare that to nearly $500 for my first loaf. Fortunately for me the cost per loaf will drop dramatically once I hit that 100 loaf mark ($5/loaf). That is “if” I can get a system built to harvest enough potential energy to keep the battery charged.

Conclusion

While being cost effective is in many cases a worthy goal in and of itself, in my case, budget be damned, I’m going to bake me some @#$%& bread! To confess in all honesty, I’ve been procrastinating for years around getting a larger inverter and appropriately sized battery for truly harvesting and using my own power at home. The purchase while larger than I would consider normally is a solid backbone and foundation for future expansion and projects I have planned to harvest and creatively use home power.

Next steps

I’d like to find the root cause as to why my no cost option failed. Here are my next steps to determine what went awry:

  1. Try baking loaf using 2k pure sine wave inverter and see how far the cycle gets. Will it get all the way through the baking cycle?
  2. Try baking a loaf using the 500W modified sine wave inverter with the 100Ah Deep Cycle Gel battery.
Categories
Uncategorized

Waiting for the delivery man

Spent the past day working on the website, researching home power and waiting for the delivery man to arrive with packages from various vendors.

Last night I was expecting some AAA battery holders and charge controllers but some issue prevented delivery. I’m hoping that they arrive today!

Placed orders for a small hydro generator (12v, 220 mAh), AA battery holders so I can create some basic 12V power for my DIY lamp conversion project.

The 12V 100Ah gel battery just arrived. What a beast, not easy to lift but does come with a nylon carrying strap. Hope that doesn’t break while I’m moving it. Now to get it hooked up the 12V charger and top it off.

Time to work on the DIY bread baking project?

Categories
Uncategorized

Hello world!

Wow! What a way to come life! Hello World 🙂

This past weekend I spent some time, as I often do, ruminating on harvesting my own power in creative ways. After years reading so many helpful and supportive websites and blog articles on home power I decided to add my collective effort and knowledge to the global pool.

It is my hope that you will learn, like me, by doing. Reading can only get you so far in the real world. This is my journey bringing my real world experiences back to you so you can learn from my successes and hopefully not repeat the mistakes.

Each of us can help make the earth a better place for our neighbors, both next door and around the globe by making small changes in our lifestyles and take small steps to directly use the power we harvest bypassing traditional energy infrastructure. No, at first it won’t be cost effective. I guarantee, in the short run, you will pay more in government currency than you will reap with respect to monetary profit or reward. Why, you may ask, should I try? The story of the Wright Brothers quickly comes to mind. Their first flight, a mere 852 feet, less than a quarter mile was no trans-Atlantic journey! Cost effective, no! Clearly not. I need not tell you how that 852 feet changed the course of human history.

Each great journey starts with a first step. Come with me, lets take these first steps together on a journey to find and implement creative ways to consume and harvest power at home.